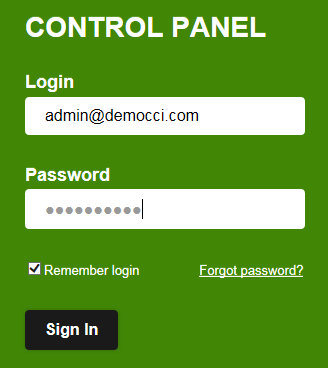
Signing In to the Exchange Admin Control Panel
The URL for the Admin Control Panel is owaadmin..com. I.e. owaadmin.democci.com.
On the login screen enter your full email address and password and click "Sign In".
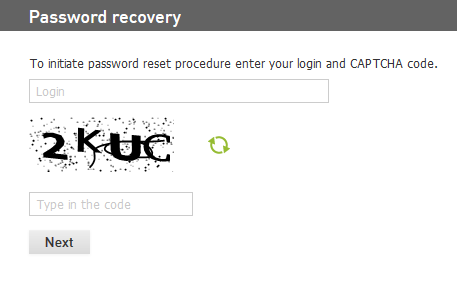
Restoring Account Password
Open the Control Panel “Sign In” page. owaadmin.yourdomain.com
If you have forgotten your password click the “Forgot password” link.
Enter your email address and the CAPTCHA code shown on the screen. Then click Next.
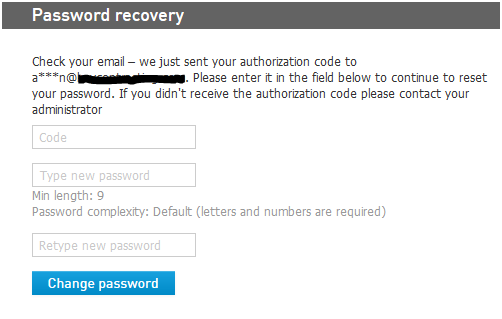
You will be sent an email with an authorization code, which should be entered along with the new password. Then click on Change Password.
Changing an Account Password
Click on the Account tab at the top of the screen. Then click on Account Contacts.
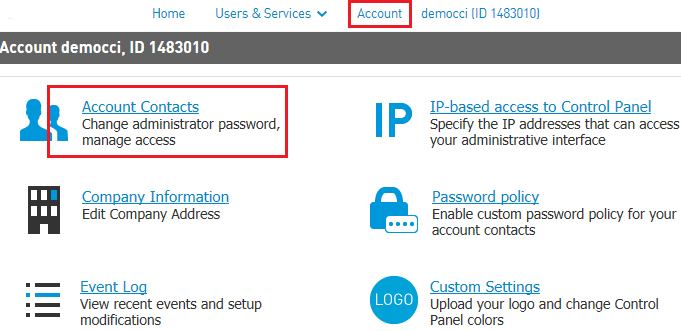
Click on the Account you need to change the password for.
Either enter the password in the password fields or click on the Generate Password to generate a random password. Then click Save Changes.
Hosted Exchange Administration
In this section:
- Mailboxes
- Modify a Mailbox
- Email Addresses
- Mail Flow Settings
- Permissions
- Mobile Devices
- Deleting a Mailbox
- Contacts
- Create a Contact
- Modify a Contact
- General Settings
- Mail Flow Settings
- Delete a Contact
- Distribution Lists
- Create a distribution list
- Modify Distribution Lists
- General Settings
- E-mail Addresses
- Mail Flow Settings
- Permissions
- ActiveSync Policy
- Accepted Domains
- Add An Accepted Domain
- Delete An Accepted Domain And Set Default Domain
The Hosted Exchange service offering contains the following components:
- Mailboxes. The amount of mailboxes is limited based on the hosting plan as well as the available storage. Mailboxes are created based on templates, so-called mailbox plans.
- Shared Contacts. Shared objects are objects that will appear in the global address list and are visible to all users within your organizations. The amount of shared contacts is limited by the hosting plan.
- Shared Distribution Lists. Shared distribution lists are objects that will appear in the global address list and are visible to all users within your organizations. The amount of shared distribution lists are limited by the hosting plan.
- ActiveSync Policy. Active Sync Policies are security related policies applied to devices that are using Exchange Active Sync to synchronize with a mailbox.
- Mailbox plans. Templates that defined the mailbox size as well as the messaging capabilities, the template will be applied upon mailbox creation.
- Accepted Domains. Organization owned SMTP domains for which email is accepted and which SMTP domain can be used in the definition of mailboxes, login names, aliases and distribution groups.
Mailboxes
You can view mailboxes by clicking on "Exchange Mailbox" on the "Home screen". You can also view mailboxes by clicking on “Users & Services” and then clicking on "Exchange Mailboxes".
Create a New User
To add or remove an Exchange user you need to do so in the Spam Filter as well as in the Exchange Control Panel. *The user must be added to the Spam Filter before email can be sent to the Exchange server for that user.
Add a user to the Spam Filter:
Add a user to Exchange:
Adding a User to the Spam Filter
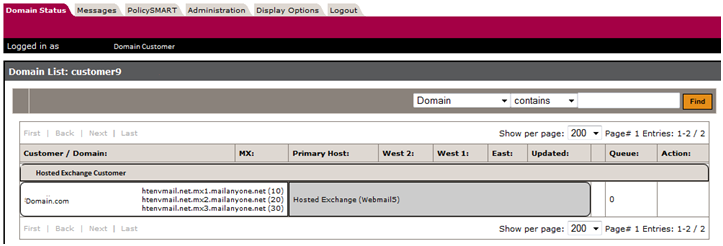
Browse to Mailadmin.yourdomain.com and log in.
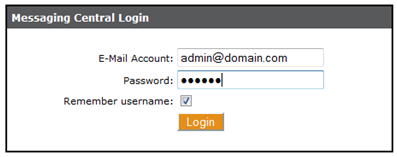
Once logged in with the admin account you will see the following:

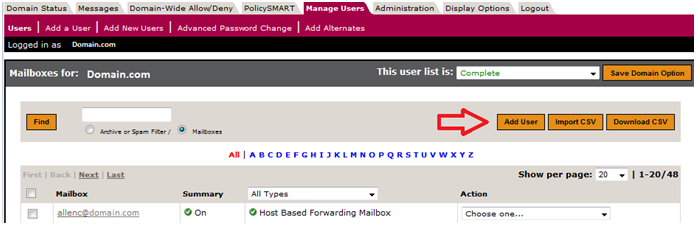
Click on the domain to view settings & users for the domain.

You will then see a list of all of your users that are being filter for spam.
*Every user must have an account here before any emails are able to be sent to the Exchange server.

To add a new user click the “Add User” button.
You will then see the following page. You will want to fill in the required fields (Mailbox & Password) and make sure that you have the “By Service” field set to “Host Based Forwarding.”

Click Next, you will then see a summary of what is being added. You can then click “Create.”
Your user is now set up and can now be added to Exchange.
Adding a User to the Exchange Server
Browse to OWAadmin.yourdomain.com and log in.
Once logged in click on “Users & Services” at the top, and then click "Manage Users". Here you will see a list of your users.
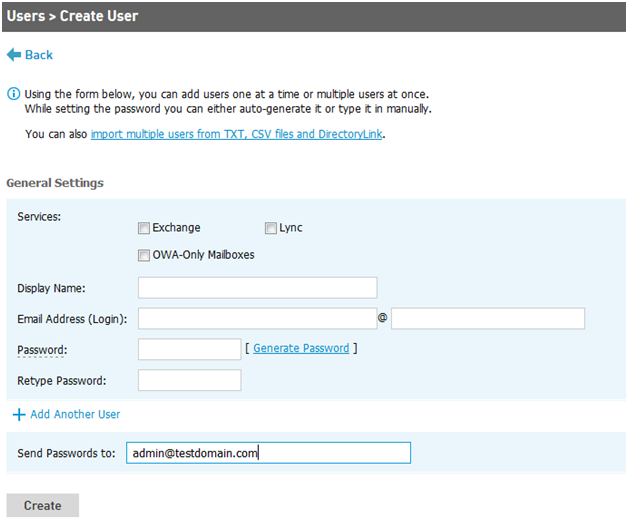
Click on “Create User” in the upper right corner.
Fill in the required fields and select the options for the New User (Services, Display Name, Email Address & Password). You can specify who should receive a copy of the password. Once complete click on "Create".
Modify a User
Click on "Users & Services" at the top of your screen, then click "Manage Users". Click on the User you wish to modify. The mailbox properties will be displayed. To edit the mailbox, click on “Edit user info”.
Permissions
In the Users & Services > Manage Users screen, click on the “Set user permissions” to edit the permissions for the user.
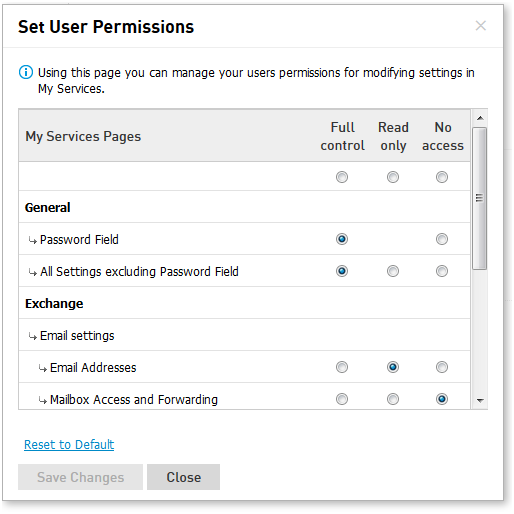
The settings you select here will determine what settings the user will have access to modify themselves.
Mobile Devices
For a user to be able to add their Exchange email account to their mobile device, ActiveSync needs to be enabled. To allow a user to use ActiveSync with their mobile device, click on "Users & Services" at the top of your screen, then click "Exchange Mailboxes". In the Exchange Mailboxes screen, check the box under ActiveSync for the user and then click Proceed.
Deleting a User
To remove an Exchange user you need to remove the user from the Spam Filter and from the Exchange Admin Control Panel.
Remove a user from the Spam Filter:
Remove a user from the Exchange Admin Control Panel:
Removing a User from the Spam Filter
Browse to Mailadmin.yourdomain.com and log in.

After you log in with your admin account you will see the following:
Click on the domain to view settings & users for the domain:

You will then see a list of all of your users that are being filtered for spam.
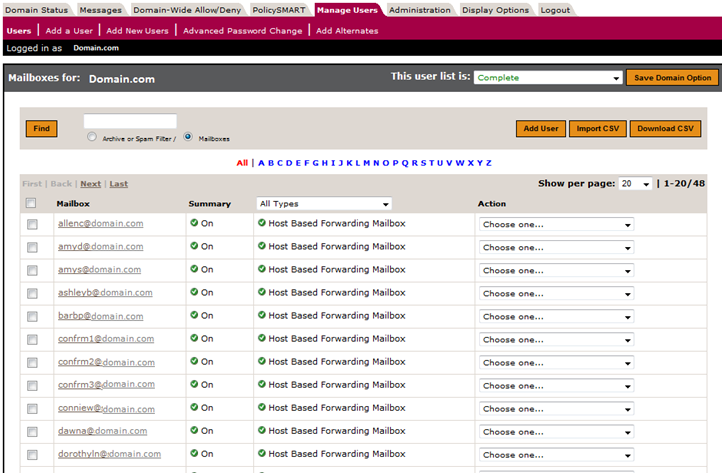
Find the user you wish to remove.
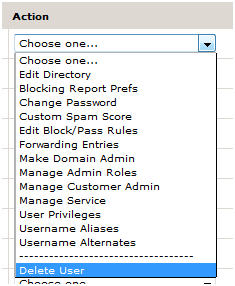
Then click on the Action drop down list, and select delete user.
*You will want to be sure that you also remove that user from the Exchange Admin Control Panel as well.
Removing a User from the Exchange Server
Browse to OWAadmin.yourdomain.com and log in.
Click on “Users & Services” and “Manage Users”. Here you will see a list of users.
Place a check mark next to any user you wish to delete. Then scroll to the bottom and click on “Delete Selected Users”. This will remove the user from the Exchange Server.
Another option is to click directly on the user and then click “Delete Exchange Mailbox”.
Contacts
Click on “Users & Services” > "Company Contacts". This will bring up the following form:
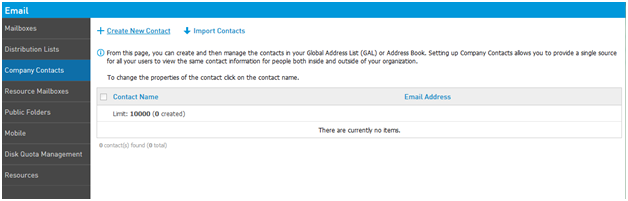
Select the “Create New Contact” button to start the process to create a new contact.
Create a Contact
After clicking the “Create New Contact” the following form will be brought up.
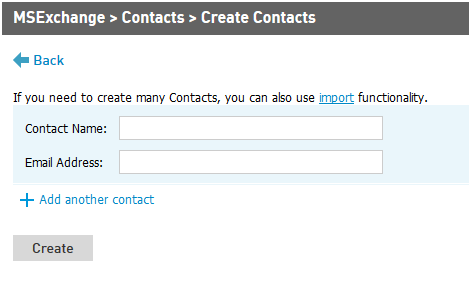
The Display Name and Email address of the contact and click “Create”.
Modify a Contact
Once the contact is created, if you double click on the contact the following form will be displayed. This form will enable you to provide more information regarding this contact.
Delete a Contact
To delete a contact, click the red cross.
Distribution Lists
Select “Users & Services” > “Distribution Lists”
Select the “Create New Distribution List” button to start the process to create a new distribution list.
Create a Distribution List
After clicking the “Create New Distribution” the following form will be brought up.
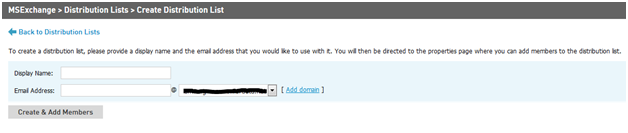
Provide the display name and email address of the distribution lists.
Once done click the “Create & Add Members”.
The management of distribution lists will take place through the control panel solution.
Modify Distribution Lists
Once the distribution list has been create or the distribution list has been selected from the list of distribution lists the list a such can be maintained.
General Settings
Select the “Edit distribution list info” and you will be able to added the Display Name, Who manages the list and any notes.
Change the display name if required by specifying the new display name.
Once all options are set and selected click the “Save Changes” to persist the changes.
Email Addresses
Select the link next to “Email Address” to add alias email address to the distribution list.
In order to add a secondary email address or so-called alias fill in the text box with the desired email address prefix and select the appropriate domain name. Click the “Add e-mail Address” to add the new email address.
To delete an email address check the box in front of the email address and click the “Delete Selected Emails” button.
To change the primary email address tick the box in front of the mailbox you like to make the primary email address and click the “Set As Primary” button. Email send will have the primary email address as sender, by setting the primary email address it will not change the login name.
Accepted Domains
Select “Users & Services” > “Domain Names” will show the accepted domains.
Accepted domains are email domains that are owned by you and you want to receive email for. The specified accepted domain can later on be used to configured email addresses.
An accepted domain will only work when this domain is registered with a DNS registrar and the name server records are pointing to your provider messaging platform where you host your mailboxes.
Add An Accepted Domain
Provide the domain name to add and click the “Add” button. If the accepted domain is not already added to the DNS environment, it will be added as such. The zone can be maintained through the DNS Editor.
Delete An Accepted Domain And Set Default Domain
By selecting the radio button next to the default domain under the default column, the default domain name can be enforced when creating new users and mailboxes. After you click on “Save Changes”
To remove an accepted domain, check the checkbox under “Remove Domain”. By removing the domain the domain extensions used will not be removed from the email addresses, this needs to be done manually. Click on “Save Changes” to complete the change.