- Logging In
- Spam and Quarantine
- Auto-Responder
- PolicySmart
- Domain Admin Setup
Logging In
-
Open your browser and enter the address of mailadmin. and press the Enter key.
- The Login screen will appear.
- To Sign In, enter your email address and password.
Spam and Quarantine
You can manage spam and quarantine settings on a domain level to update settings for all users under that domain, or manage settings on a per user basis.
To manage Spam and Quarantine settings on a domain level for all users:
- Once logged in to the messaging central portal, click on your domain name on the black bar at the top of your screen. Doing this will bring you to the domain level for updates.
- Click on the Administration tab
Here you will see a list of Service Options. The two key options we’re going to cover here are the SpamSMART Service Options and the Quarantine Summary Options. These two options work in conjunction with each other. Under SpamSMART Service Options you can set the sensitivity of the spam filtering settings to determine what type of emails should be quarantined. Users will receive a Quarantine Summary Email including a summary of the emails quarantined as per your SpamSMART filter settings. Under Quarantine Summary Options you can adjust settings for when and how those summary emails are sent.
- Click on SpamSMART Service Options
This is where you can make changes to the Spam Filter Settings. You will see the default settings are already populated but can be adjusted. The Spam Filter settings are set with the default of Low Threshold = 4 and High Threshold = 8, meaning that any emails that have a spam score of 4 to 8 are stopped from being delivered and are quarantined.
- Click on Quarantine Summary Options from the service options on the administration tab
This is where you can make changes to the quarantine summary email settings. You will see the default settings are already populated. You can adjust these default settings at any time.
The Domain Settings default settings for the Quarantine Summary Options are as follows:
- Summaries: enabled for all users
- Summary Sender Address: qcsummary@.com
- Auto Subscribe: enabled (so any new mailbox created will automatically get quarantine summaries)
- Domain-Wide Summary: disabled
Note: If you enable the domain-wide summary it will cause your users to receive a summary of all quarantined messages sent to all users on your domain. Typically you will want this to remain disabled. Users will only want to see a summary of their own quarantine summary.
- You will then see the options titled User Defaults
Under User Defaults you can choose settings such as displaying links for automatic login, password reset and message delivery to be displayed within the quarantine email that is sent to your users.
An important item to note regarding the "Do not send blocking report if blank" option:
By having the "Do not send blocking report if blank" checked, your users won’t receive a quarantine summary email when there are no emails quarantined. They will only receive a quarantine summary email if there were emails quarantined.
To manage Spam and Quarantine settings per specific user:
- Click on the Manage Users tab
- Under the user you’d like to update, click on the Action dropdown and select "Blocking Reports Prefs"
This will bring you to the settings for the specific user and updates can be made directly to that user’s account. Once on a specific user account, the instructions for changing settings are the same as the above instructions for updating them on a domain level. You can set custom spam scores, schedule different quarantine delivery schedules, or disable spam filtering on a per user basis. Changes to a specific user account will override the global domain settings for that individual user.
- Allow Deny List Configuration
This will allow you to whitelist and blacklist email addresses, domains and IP addresses.
- Click on the Personal Allow/Deny tab to make updates to the email address you’re logged in as.
- Click on the Domain-Wide Allow/Deny tab to make updates to all emails within that domain.
- On the Personal Allow/Deny tab or the Domain-Wide Allow/Deny tab you’ll see there is a box to enter in an email address, domain, or IP address to ALLOW, and there is a space to enter those items to DENY.
Auto-Responder
To turn the Auto Responder On
- To setup an auto-responder message login to mailadmin..com
- Go to the domain level by clicking on the domain name on the black bar at the top of your screen
- Select the user you want to activate an auto-response for
- Under Action for that user, you’ll click Subscribe for Auto-Responder Mailbox
- You can then enter the automatic respond message and automatic respond schedule. Entering the message in the HTML field as well as the regular Text field will ensure the automatic response is viewable by devices that require HTML such as mobile phones.
To turn the Auto Responder Off
- Click on the Manage Users Tab
- Click on the Action dropdown
- Select Manage Service
- You can then either click on Suspend or Unsubscribe.
- The Auto Responder is now turned off.
PolicySmart
PolicySmart Overview:
- These are mail rules which can be applied to inbound mail or outbound mail.
- Allows enforcement and adherence to company email security policies and regulatory compliance
- Set up a wide variety of policy enforcement rules
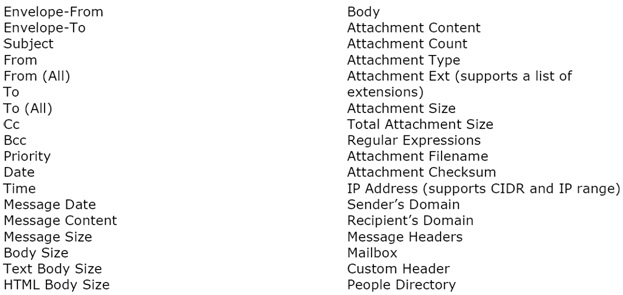
- Available Policy Filter Criteria:
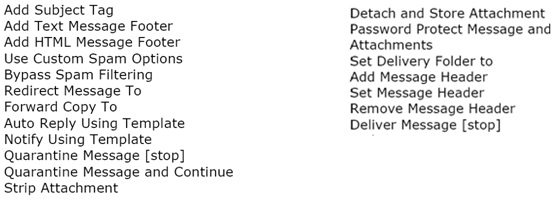
- Available Policy Actions:
Setup a new Policy with PolicySmart
- Click on your domain name on the black bar towards the top of your screen which will bring you to the domain level for making updates.
- Click on the PolicySmart tab.
Here you will see the options for Inbound Policies and Outbound Policies on the top left of your screen. The setup instructions are essentially similar for both inbound and outbound, so we will walk through creating a new Inbound Policy for this instructional example.
- Click on Inbound Policies.
- Click Create a New Policy.
- On the next screen enter a name for the new policy you are setting up.
- Assign the email address or addresses for the mailboxes that you would like to apply the policy to and click on Next. Here you can specify either one or many rules.
- For this example we’ll choose Match ALL of the rules specified and Body Contains: the word "sale". Click Next.
- Choose the action you want to perform if this rule is matched. There are several actions to choose from. For this example we’ll choose to quarantine the message.
- This particular rule will then ask how long you would like the quarantined messages stored. There are different options per rule. In this example we’ve entered 30 days.
- Click SAVE. The rule is now in place and you will be brought to the Policy Summary screen.
- If you want certain policies to apply before others, you can move the policy up or down in the list on the Policy Summary screen.
Note: By default all mailboxes are setup with the Policy for Spooling. This means that for 14 days any incoming or outgoing mail is spooled on the Messaging Central Portal, and the spooled mail is available under the messages tab.
Domain Admin Setup
This will walk you through the process of setting up a user as a domain administrator.
- Click on the domain name on the black bar towards the top of your screen.
- For the user you would like to make domain admin, click on the Action dropdown to the right of that user and select Make Domain Admin.
- You will be brought to the following screen. The only required field on this screen is the work phone number.
- Enter the work phone number and click Yes.
- This user is now a Domain Administrator and the setup is complete.